In this post I'll explain how you can create your own drum kit for Studio One's dedicated drum app, Impact XT.
This kit will be compatible with the General MIDI (GM) standard. This will allow you to play any MIDI drum loops that follow the GM standard and share your grooves and projects with others easily.
Building a kit is actually easy - you just have to drag and drop drum samples onto pads in Impact XT.
Free Template: I've included a link below to download a GM compatible preset to get you started. You can use it each time you make a preset for Impact XT.
Pro Tips: I also included a couple of tips at the end to help you get more realistic sounding drum tracks.
Let's get started!
General MIDI (GM) Compatibility
If you want to play MIDI drum loops produced by others you need a kit that follows the same layout or "mapping". The industry standard is called "General MIDI" or just "GM" for short.
Without a common standard, you have to rearrange some or most of the notes in every single file or rearrange your kit mapping (if possible). Having a standard avoids all of this unnecessary work and allows you to start making music immediately.
All of our MIDI Drum Loop packs include files mapped per the GM standard. Click here to Browse our MIDI Drum Loop Collection
Note: As of early 2023, only ONE of the kits provided with Impact XT follow the GM standard. You can view this blog post on Studio One 6 to learn more.
Download the GM Template
First, download our Free Impact XT GM Template. The pads in this preset are already named with all of the drum kit pieces needed for a complete GM drum kit . You can reuse it as many times as necessary.
Save the preset in your Studio One "presets" folder for Impact. You should be able to find the "presets" folder here:
Documents\Studio One\Presets\PreSonus\Impact
PC: C:\Users\<username>\Documents\Studio One\Presets\PreSonus\Impact
Mac: /Users/<username>/Documents/Studio One/Presets/PreSonus/Impact
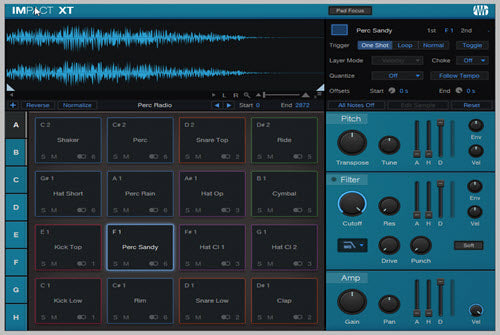
The image below shows our GM_Drums template.

Drum Samples Needed
You'll need some drum samples to build a kit. Bedroomproducersblog has a list of 10+ sites with good, free drum samples. Read more here.
Building a Drum Kit
Building a kit with our GM preset is very easy. Here are the steps needed to make your own kit.
1. Add Impact XT into Studio One
Open the Studio One 'Instruments' view (F6) and then click on 'PreSonus'.
Drag Impact into an empty area and Studio One will create an instrument track loaded Impact as shown in the video below.
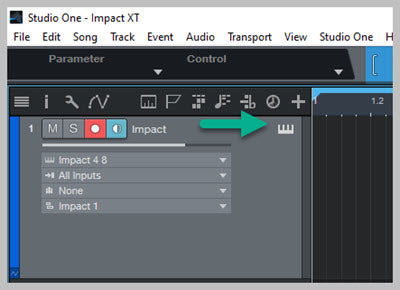
Tip: Anytime you need to view the Impact interface, click on the piano-like icon in the upper right corner of your Impact instrument track as shown in the image below.

2. Import our GM Drums preset into Impact XT
Depending on where you stored our GM preset, you may have to import it first.
To import a preset, click on the Impact preset menu (upper left side, next to the two arrow icons). Then click on 'Import Preset'.
Select to the preset you wish to import and click 'Ok'.

To check for our preset, scroll through the list of available Impact kits and look for GM_DRUMS.
Rename the preset!
To rename the preset, select the Impact preset menu (upper left side next to the two arrow icons) and select 'Store Preset'. On this page you can rename the preset, add an optional description and save the preset to a specific subfolder (optional).
3. Open the Studio One 'Files' view
Studio One makes it easy to drag samples into Impact pads using their 'Files' view. You can audition audio files, MIDI files and more in this view.
To open the Files view, select 'Browser' from the View menu. The browser window should open on the right-hand side of Studio One.
Note: The short cut is F9 on both Mac and PC.
Then select the 'Files' tab to open the Files view. In this window, you can browse for files that are stored anywhere on your computer.
4. Adding a sample to a pad
Navigate to your drum samples using the File view window. Select a drum sample and drag it onto a pad in Impact. Rename the pad if necessary.
You can also assign a choke group, assign an output channel and tweak the sample's sound in many different ways.
Note: See below for additional information about choke groups and channel assignments. We've already created a choke group for the hi-hats and we are using 6 mixing channels for the kit.
Continue building your drum kit like this until you're satisfied with it. Don't forget to save your work occasionally!
Cymbals
The GM standard has 4 cymbals (not counting the 2 rides): crash 1, china, splash and crash 2.
Our GM template works as expected even if you only have 2 crash cymbals. That's because Crash 1 is routed to the Splash cymbal and Crash 2 is routed to the China cymbal.
If you have samples for the splash and/or the china, you can add those in bank 'B'. Impact has a total of 7 banks (A through H). You can select a bank along the left edge of Impact.
Pad Routing
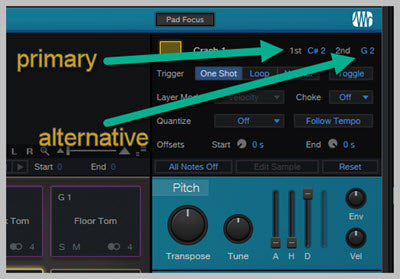
The image below shows the default instrument routing for Crash 1. You can change or remove the alternative instrument. To change it, type in a new value. It will accept either a note like 'C2' or a number like 52. To delete it, just click and delete the value.

Toms
Our preset covers all 6 toms specified in the GM mapping because two of the slots handle two toms each.
The High Rack Tom covers MIDI notes 50 and 48 while the Floor Tom covers MIDI notes 43 and 41, the high and low floor toms respectively.
Pro Tip 1: Choke Groups
To silence a sound you need to 'choke' it. A 'choke group' allows you to define a set of sounds that will silence each other automatically.
The most common and useful example involves hi-hats. To be realistic, you need to silence an open hi-hat whenever a hi-hat 'pedal' or 'closed' hi-hat is triggered.
Note: our GM Drums preset includes a choke group for the hi-hats.
How to Create a Choke Group
Click on one of the pads. On the upper right side of Impact you'll see information about the pad including a 'Choke' setting. Select a number for the choke group.
Next, assign each of the related pads to the same choke group. Finally, update your preset. On the upper left side of Impact, there's a an icon to the left of the two arrow icons. Click that icon and select 'Update preset'.
Pro Tip 2: Multi-Channel Mixing
Separating your drum sounds into many different channels can dramatically improve the quality of your sound.
By default, Impact has 9 channels you can use. You can group related sounds together into separate channels for better mixes. Then you can control each group separately. You can apply different effects to each group and adjust the panning, volume, etc.
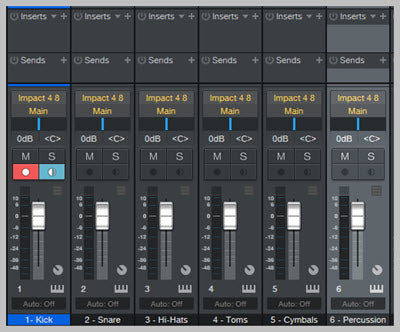
Our GM Drums preset is configured to use six channels.
- Kick
- Snares
- Hi-Hats
- Toms
- Cymbals
- Percussion
For convenience, you can rename the channels in the Studio One 'Mix' view as shown at the bottom of the image below.

Changing a Pad's Channel
A pad's channel assignment is visible in the lower right side of the pad. To change the pad's channel, click on the number and select another channel. Then save (update) your kit when finished.
Studio One Effects for Drums
Studio One includes a very generous amount of effects and effect groups. You'll find effect groups designed for your entire kit along with those made for specific drum sounds like kick and snare.
Open the Studio One 'Mix' tab, select a channel's 'Insert' drop down and then click 'Drums' to see what's available. You'll find some really cool, easy to use effects here!

Support
Feel free to contact us with questions about using our files with Studio One. Our contact info can be found on our Contact Us page.


