
If you're using our MIDI loops with Steven Slate Drums, using multiple outs for drums is one of the easiest ways to improve your mixes. This post will explain how to set up multiple outputs in Studio One. This simple 3-step process is basically the same no matter what recording software you’re using.
Step 1
If you inserted Steven Slate drums as a stereo device, you can still add the channels you need. Here’s how to enable additional channels in Studio One.
- Go to the View menu and select Console
- Look for Steven Slate under Instruments
- Click Expand to view available channels
- Activate the channels you need (click the check boxes)
Note: You can deactivate any unused channels later by deselecting them.
The image below shows an enlarged view of the channels activated in SSD4. Click the image to enlarge.

For this example, I’m using 7 channels in Studio One. We’ll route SSD mixer channels to these in the next step.
Step 2
Next, we need to route the SSD mixer channels for each microphone to a channel in Studio One. The kits often have different mic configurations so what you see may differ slightly.
For example, some kits have two mics on the kick and/or snare drums.
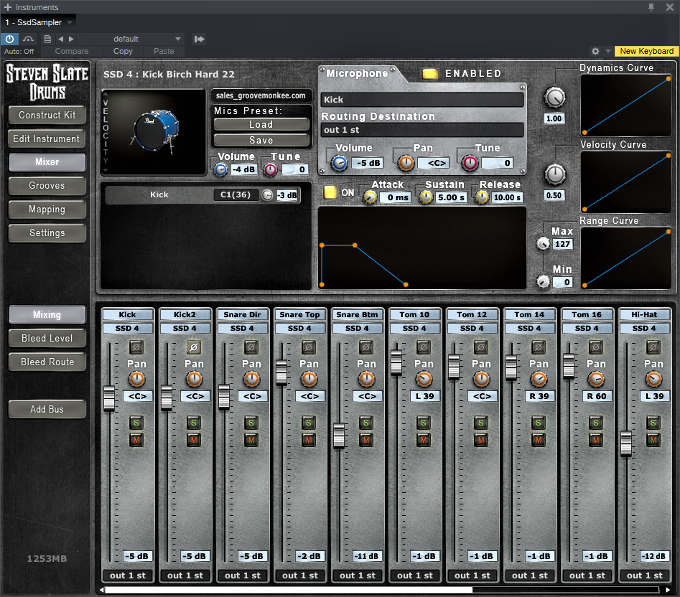
To route the channels, open SSD and select the “mixer” tab. Then select the “mixing” tab below (if necessary).
To change the routing, click on the rectangular section near the bottom. They’re probably all set to: “out 1 st”. In this example, I’m using the following:
- kick to out 1
- snares to out 2
- toms to out 3
- hi-hat to out 4
- china/ride/splash to out 5
- room mic to out 6
- overhead to out 7
Note: Depending on your requirements, you may use a different routing scheme. For example, you might use a dedicated channel for the ride (jazz) or china (metal). Or, you might use two channels for the toms (separate the rack toms and floor tom).
The image below shows the channel routing in SSD4 mixer. Click the image to enlarge.

You may want to set the levels for each channel in Steven Slate Drums to 0dB and control the levels from within your recording software.
The final step is to label the channels in Studio One.
Step 3
Finally, we’ll label the Studio One channels. By default, they will be labeled with numbers. Mixing will be much easier if you use descriptive labels for each channel (kick, snare, hats).
To rename the channels, click the channel name section at the bottom and type something more descriptive such as kick, snare, etc. By default, the channels in Studio One are labeled with channel numbers.

The image above shows the renamed channels in Studio One. Click the image to enlarge.
That's it! It's very easy and takes about 5 minutes. It's best to prepare by examining the kit you plan to use and think about how you want to route the individual mics. You may want to write the assignments down and use it as a guide during setup.
Finally, you can save the empty project as a template for future use, saving you time.

